Back To My Jaguar CD Repair Guides | Linkovitch's Jaguar CD repair guides
The first Jaguar CD I bought off of eBay was sketchy from the start. It arrived with the platter jammed down, presumably during shipping, such that it wouldn't spin until I pried it back up, as described here. Even then, it struggled to play any CD-R content. Since my whole motivation for buying one had been quick access to homebrews and the BJL loader CD, this was kind of a bummer. It would play disks burned on one of my two burners, as long as they were a particular brand of Sony CD-Rs that I happened to have a few of lying around, but which were no longer manufactured. It wouldn't touch any of the various incarnations of CMC Magnetics disks I had (All my other CD-Rs, branded Memorex, Verbatim, and Philips, have the same CMC Magnetics manufacturer code). Once I got a second CD unit and successfully repaired it, I stuck the first one in a box in the closet and ordered a new transport for it. After a few months of shipping, it finally arrived, I swapped it in, and was rewarded with another Jaguar CD unit capable of reading all the cheap CD-Rs I could throw at it, with one catch: The magnetic mechanism in the lid that clamps the Jaguar CDs to the platter was not working properly. It would slip and the disks would skid around like crazy unless I taped them down instead.
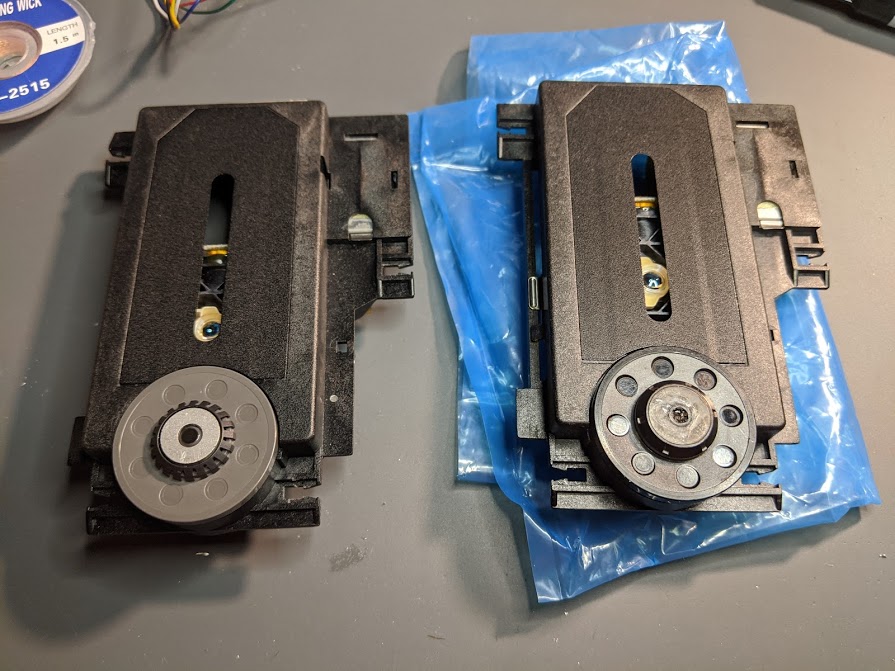
What was going on? Well, here's a picture of the old transport (left) and the new transport (right)*. Notice the difference?
That silver part in the middle of the grey platter the disk sits on is a magnet. The black bit in the center of the black platter is also a magnet, but it is much weaker. I tested this by touching the tip of my needlenose pliers to each and pulling it off. It snaps right off the black magnet, but I'm able to lift the entire CD unit by the pliers with the grey platter's magnet. Big difference.
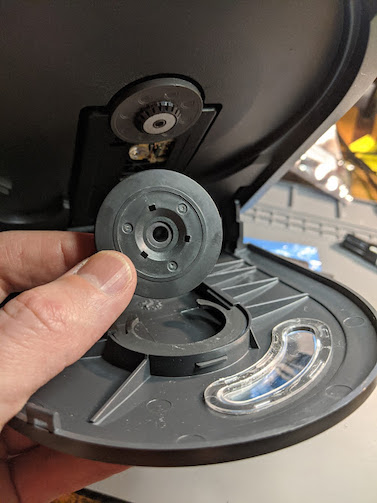
The way the lid's clamping mechanism works is there's a relatively free-floating plastic disk in a bracket in the middle of the lid that rests on top of the CD when the lid is closed. This disk contains a magnet as well, oriented such that it is attracted to the one in the platter, firmly clamping the CD in place between the platter and the lid disk.


With this black platter, the magnetic force is not strong enough to clamp the disk in place, so it was slipping around when the platter spun up. Too much acceleration, not enough friction.
If you're in the same situation, there's no need to throw the transport out and play the eBay SpeedPAK lottery again. There's an easy fix. First, pry the black platter off the new transport. I used a hooked pair of tweezers for this task, which made it quite easy. However, I've done the same task with a small flathead screwdriver several times as well. You want something small enough to fit in the little slots in the casing under the platter that are seemingly made for this task, so you can apply force near the center of the platter rather than near the edge.
Go slow! You'll hear plastic creaking and popping, as I think the black platters are secured in place with glue. Pry a little, cringe at the sound of plastic+glue bonds shattering, spin the platter a bit to ensure all the force you're applying doesn't bend the motor axle the platter is mounted on to one side, pry some more. Eventually it will start to give.


A fair amount of force is required at first, but once it losens up you can work it off bit by bit with steady, light force. This is easiest with the transport out of the CD unit, but you can also do it after installing the transport and reassembling the unit if needed. Just be careful not to slip and scratch up your rare hardware.
Next, make a note of the height of the end of the axle relative to the top of the platter on the old transport, then repeat the prying process to get the grey platter off the old unit. Then press the grey platter down onto the axle of the motor on the new transport. Take care not to push it down too far, or it will jam and won't spin. If this happens, just gently pry it back up again. I've found the best way to avoid this is to push it down by placing a flathead screwdriver flat over the middle of the platter and pushing down on it. This helps you avoid pushing the platter down below the top of the axle, generally giving you roughly the right platter height.
And that's about it. If you haven't installed your new transport yet, run through that process. Once you're done, fire it up and pray. You should end up with a good-as-new-or-better CD unit if everything went well.
* OK, I lied a little. The black platter pictures above are actually of an old broken transport I stuck the black platter on as a mock-up after I'd already done the repair described here.
Back To My Jaguar CD Repair Guides | Linkovitch's Jaguar CD repair guides