Back To the Alpine Board Saga Index | Back To My Jaguar Info & Repair Guides
The Backstory
Back To the Alpine Board Saga Index | Back To My Jaguar Info & Repair Guides
While working on some code on the Jaguar using a Skunkboard + the Skunk GDB server, jserve, I ran into a situation where I couldn't readily debug the section of code I wanted to. It was at the beginning of a ROM, so I couldn't set a breakpoint in it because breakpoints are achieved by saving the actual instruction at the breakpoint location and overwriting it with an instruction that forces an exception. The exception handler then restores the original code and generally prompts the debugger user for some input so they can examine the machine state and continue or deduce what is about to or has already gone wrong, which is what I wanted to do. However, ROM space is write- only on a Skunkboard unless you're willing to go through the heroics of erasing and rewriting an entire flash sector, so that wasn't an option. The alternative of slowly stepping through the code one instruction at a time using the 68k trace mode also wasn't realistic: The code was far enough in that this would take hours even if I just held down enter to constantly continue.
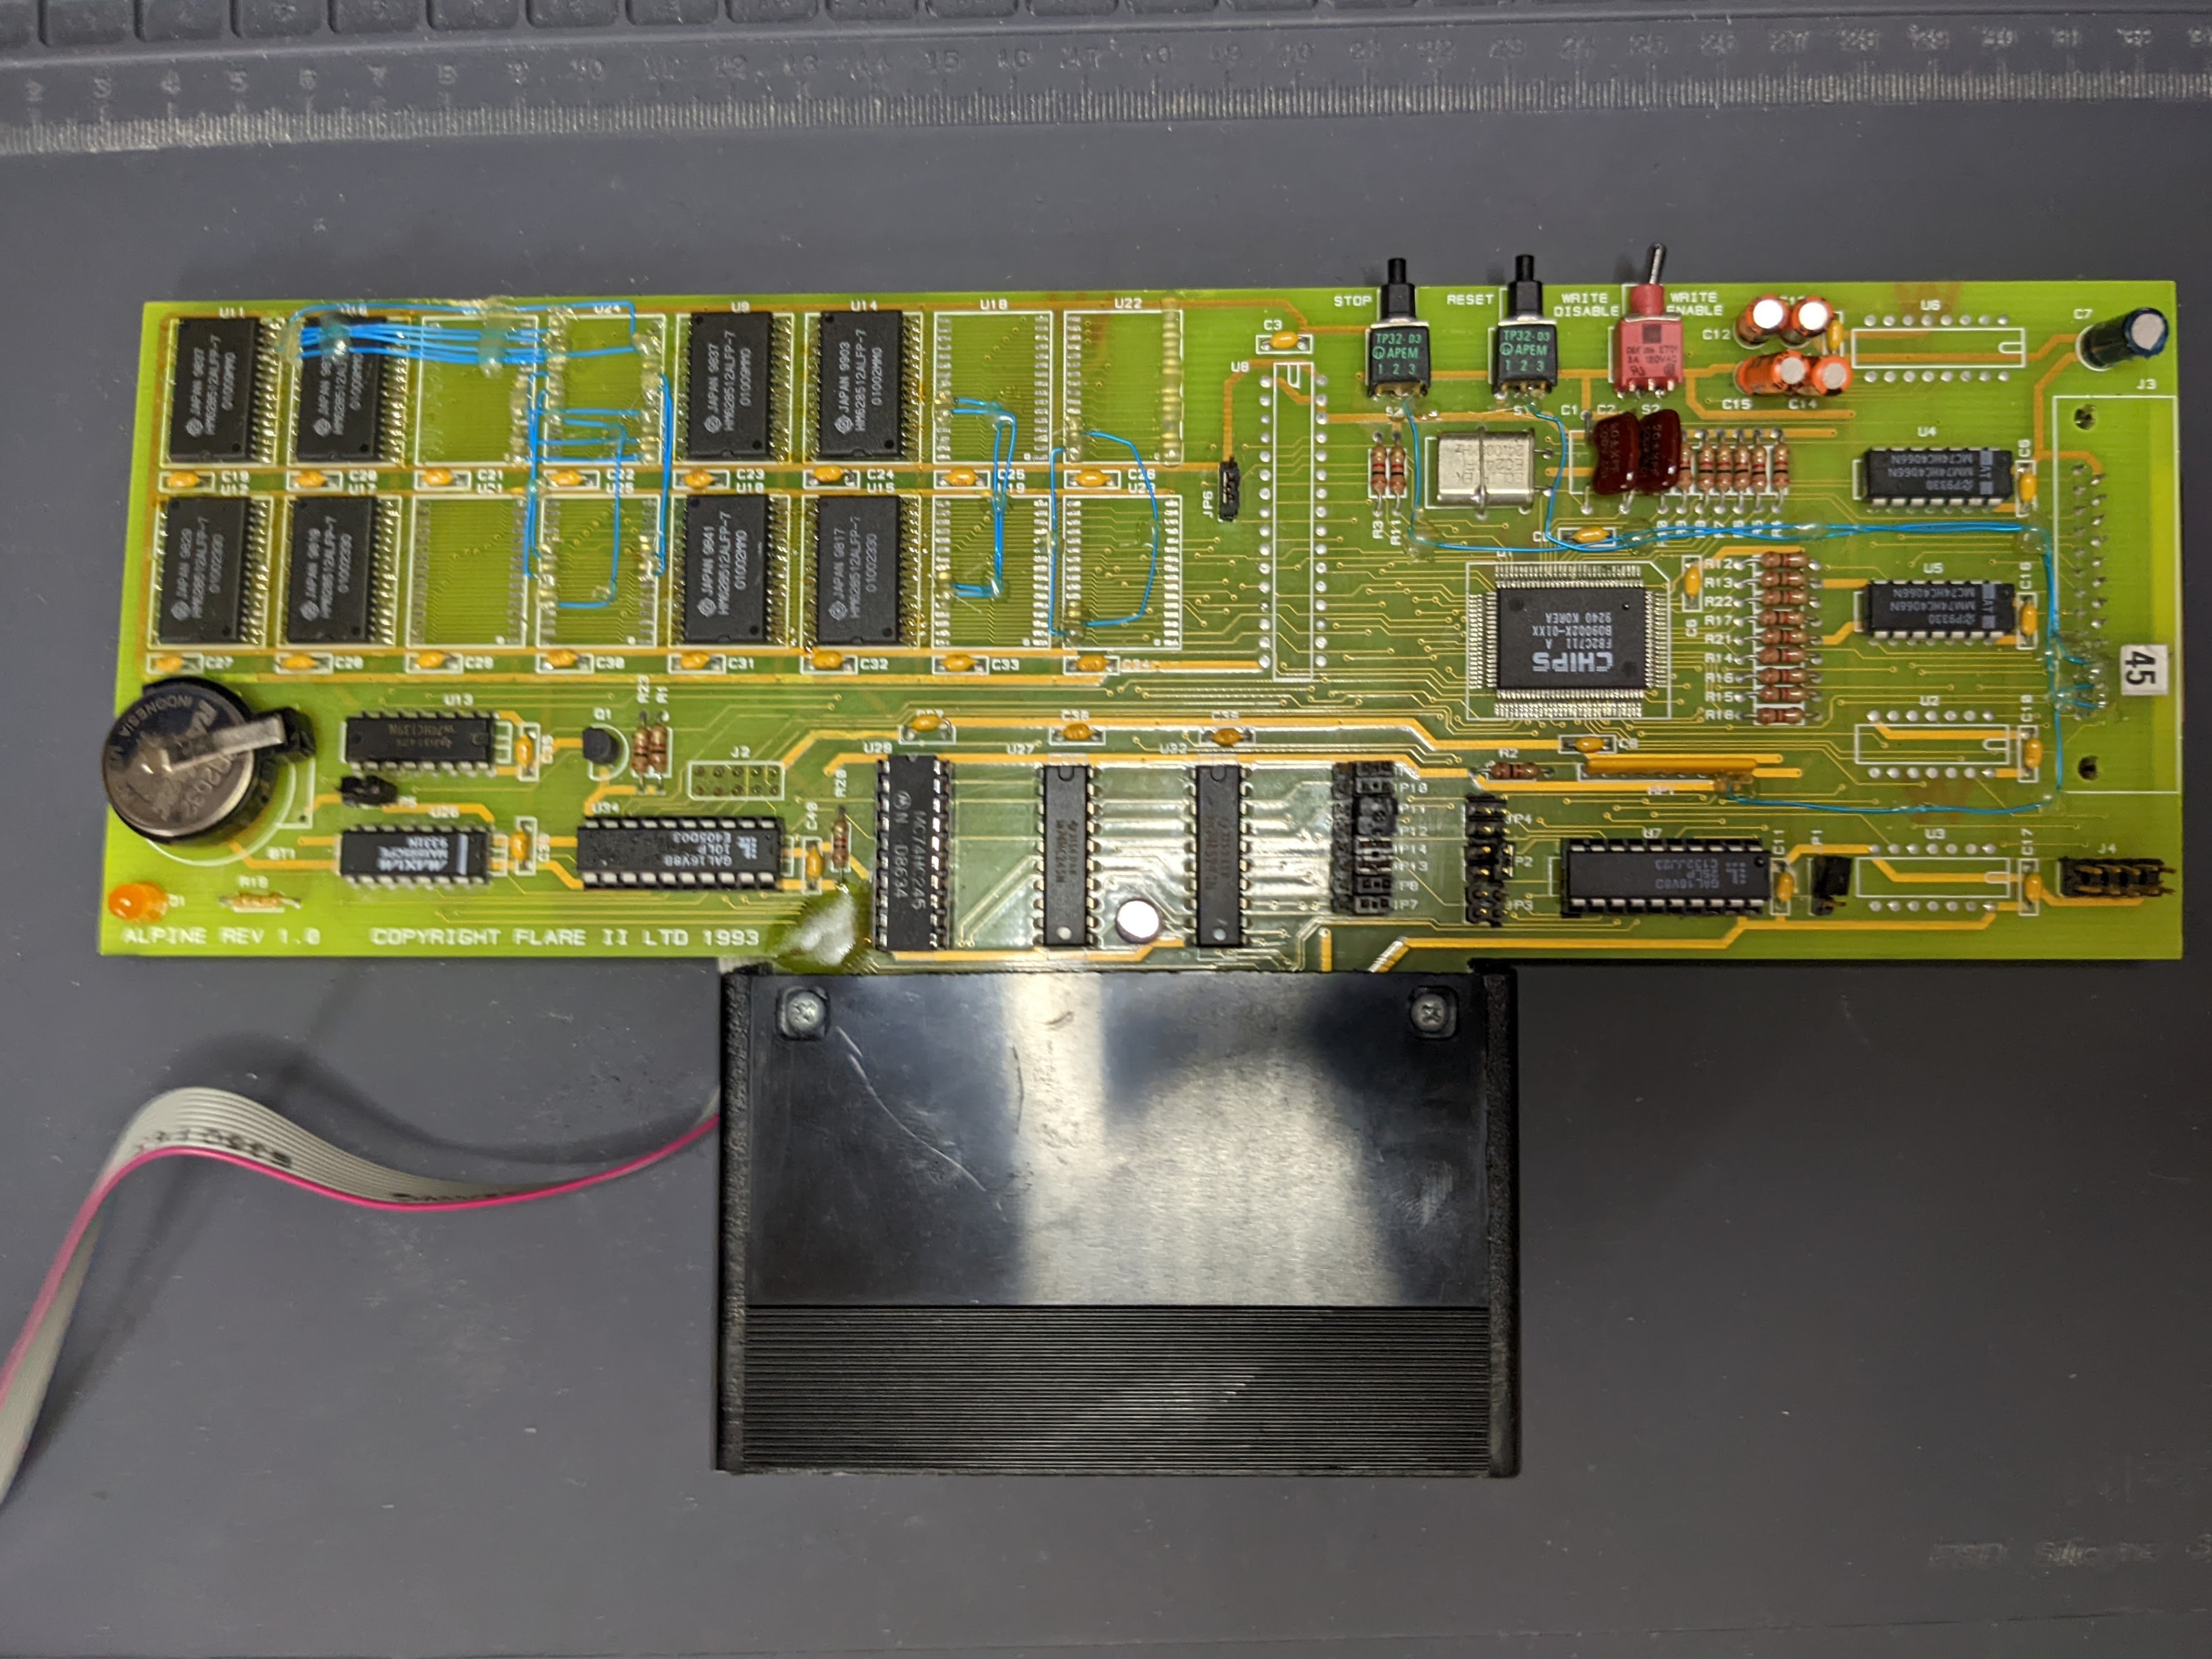
What I needed was a way to drop back into the debugger once I observed the program had reached its bad state. There are various software heroics that can be used to achieve this (E.g., patch a breakpoint into my ROM image manually prior to uploading it), but the solution I had my eye on was Alpine's infamous "Stop" button. For those not familiar, an Alpine board is what Atari gave Jaguar developers to use when writing games for the Jaguar. It is a cartridge you plug in to the standard Jaguar cartridge slot like any other, except the top of the shell has been sliced off and the truely massive PCB protrudes out of it. You can find some pictures and more info on Glenn Bruner's Alpine Page.
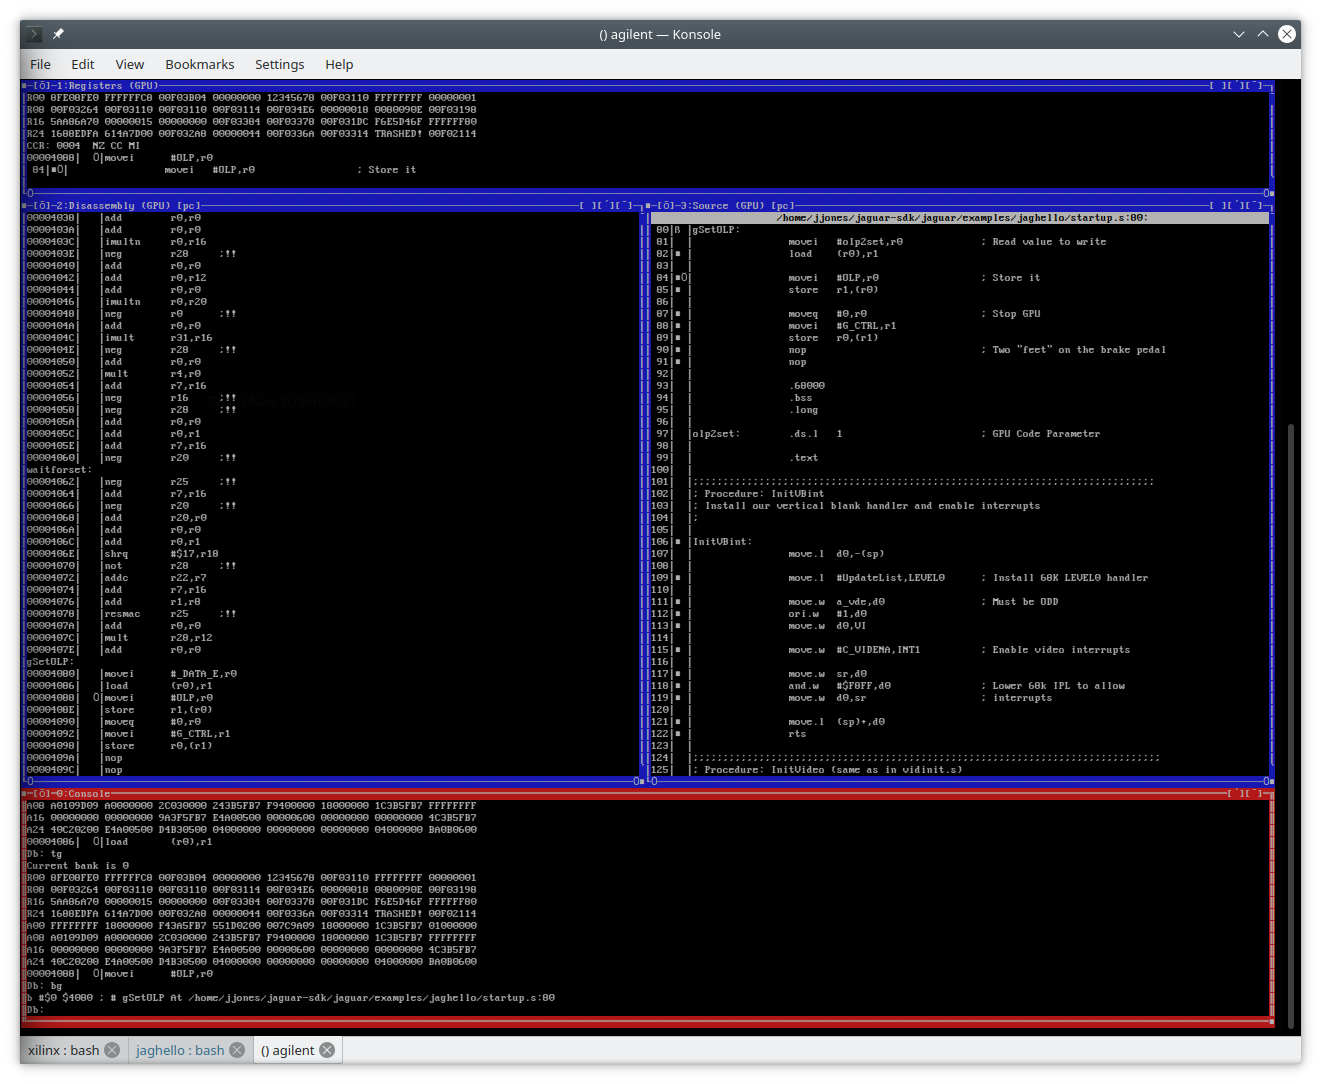
When combined with a Jaguar Development System and appropriate software on a PC connected to the board via the parallel port, the Alpine board is a powerful debugging tool. It has 2-4MB of RAM on board. The debugging software on the PC side can be used to upload ROMs into that memory and run them more or less like regular cartridges. The debugging software is also more advanced than any currently available modern replacements. Besides source-level debugging of 68k code, it supports source-level debugging of the JRISC processors in the Tom and Jerry chips, allowing you to step through GPU and DSP code one instruction at a time, or to set breakpoints in GPU and DSP code.
The Stop Button is a physical button on these boards that, when pressed, triggers an exception on the 68k, dropping the user into the debugger on the connected PC, just like I wanted to do. This is accomplished via a cable connecting the stop button directly to one of the interrupt lines on the 68k processor on developer Jaguar systems, along with some other signals routed to a programmable logic chip on the Alpine. It should be noted that a Jaguar Development System isn't particularly special. It is a regular Jaguar with a 10-pin header soldered onto some holes present on all Jaguars and a ribbon cable connected to that header running out the back of the case to connect to an identical header on the Alpine board, along with a development BIOS instead of the regular retail BIOS. I got to thinking: One doesn't actually need an Alpine and its tools just to implement the stop button behavior. All that should be needed is to connect the interrupt line to a switch and plug in some exception handlers like those already wired up by the existing Skunk GDB server code. Well, it turns out that isn't quite accurate. You can read all about my experiments thus far with that over on the thread I started on AtariAge. I still believe this can be made to work, and plan to experiment further soon.
However, while I was asking around for info on how the Alpine boards worked, I was made an offer I couldn't refuse: The opportunity to purchase an actual Alpine board of my own! What better way to figure out how the Alpine works and replicate bits of its functionality than to have my own working unit to experiment with and use for comparison? Arrangements were made, and the board was shipped. However, before it could be used, some preparation was required. As mentioned, the Alpine requires a Jaguar Development System. I had the BJL-modded system with a socketed BIOS chip I had been using to run my stop-button-replacement experiments. I had an EEPROM programmer. I had a copy of the "Stubulator" BIOS used in development systems. However, I still needed a few odds and ends to build what I had in mind.
I had a few high-level goals in mind when I started planning out the required hardware modifications:
The reasoning here is straightforward: I have space for one "bench" Jaguar in my office where I generally do my Jaguar development. I would like to be able to develop on the Game Drive, which requires a retail BIOS to boot. I build Skunkboards as well, and currently the only way to bootstrap the BIOS on those is using a BJL BIOS to upload the initial Skunk flashing code. Hence, to meet my existing needs while using an Alpine board in this system, I'd need a way to support a total of three separate BIOS images on the same system. I didn't want to keep opening the system or leave the case off and keep prying BIOS chips out of a rather fragile socket on an aging motherboard to swap between them, so I'd need a method to select between the 3 BIOSes using an external switch of some sort. I already had a two-way switch to select between the BJL BIOS and the retail BIOS in this system. I've seen a few fancy modifications with microcontrollers, but I wasn't going for perfection, and I find these "long- press" interfaces a little annoying to use in practice. In the end I went with a simplified version of Robert Demming's 5-way BIOS mod. I thought the rotary dial was a little clumsy, and I didn't see any reason to have both the 1993 and 1994 revisions of the Stubulator BIOS, so my solution uses a 3-position switch in place of the rotary switch, giving me a total of 4-BIOS options. I don't really see myself using JagOS that often, so I currently have two variations of the BJL BIOS (My 1.06.1 version and the 1.06.d version that includes a cartridge dumping utility in place of Marble Madness), but who knows, I may come around to JagOS in the end since you can always upload a cartridge dumping utility over BJL anyway.
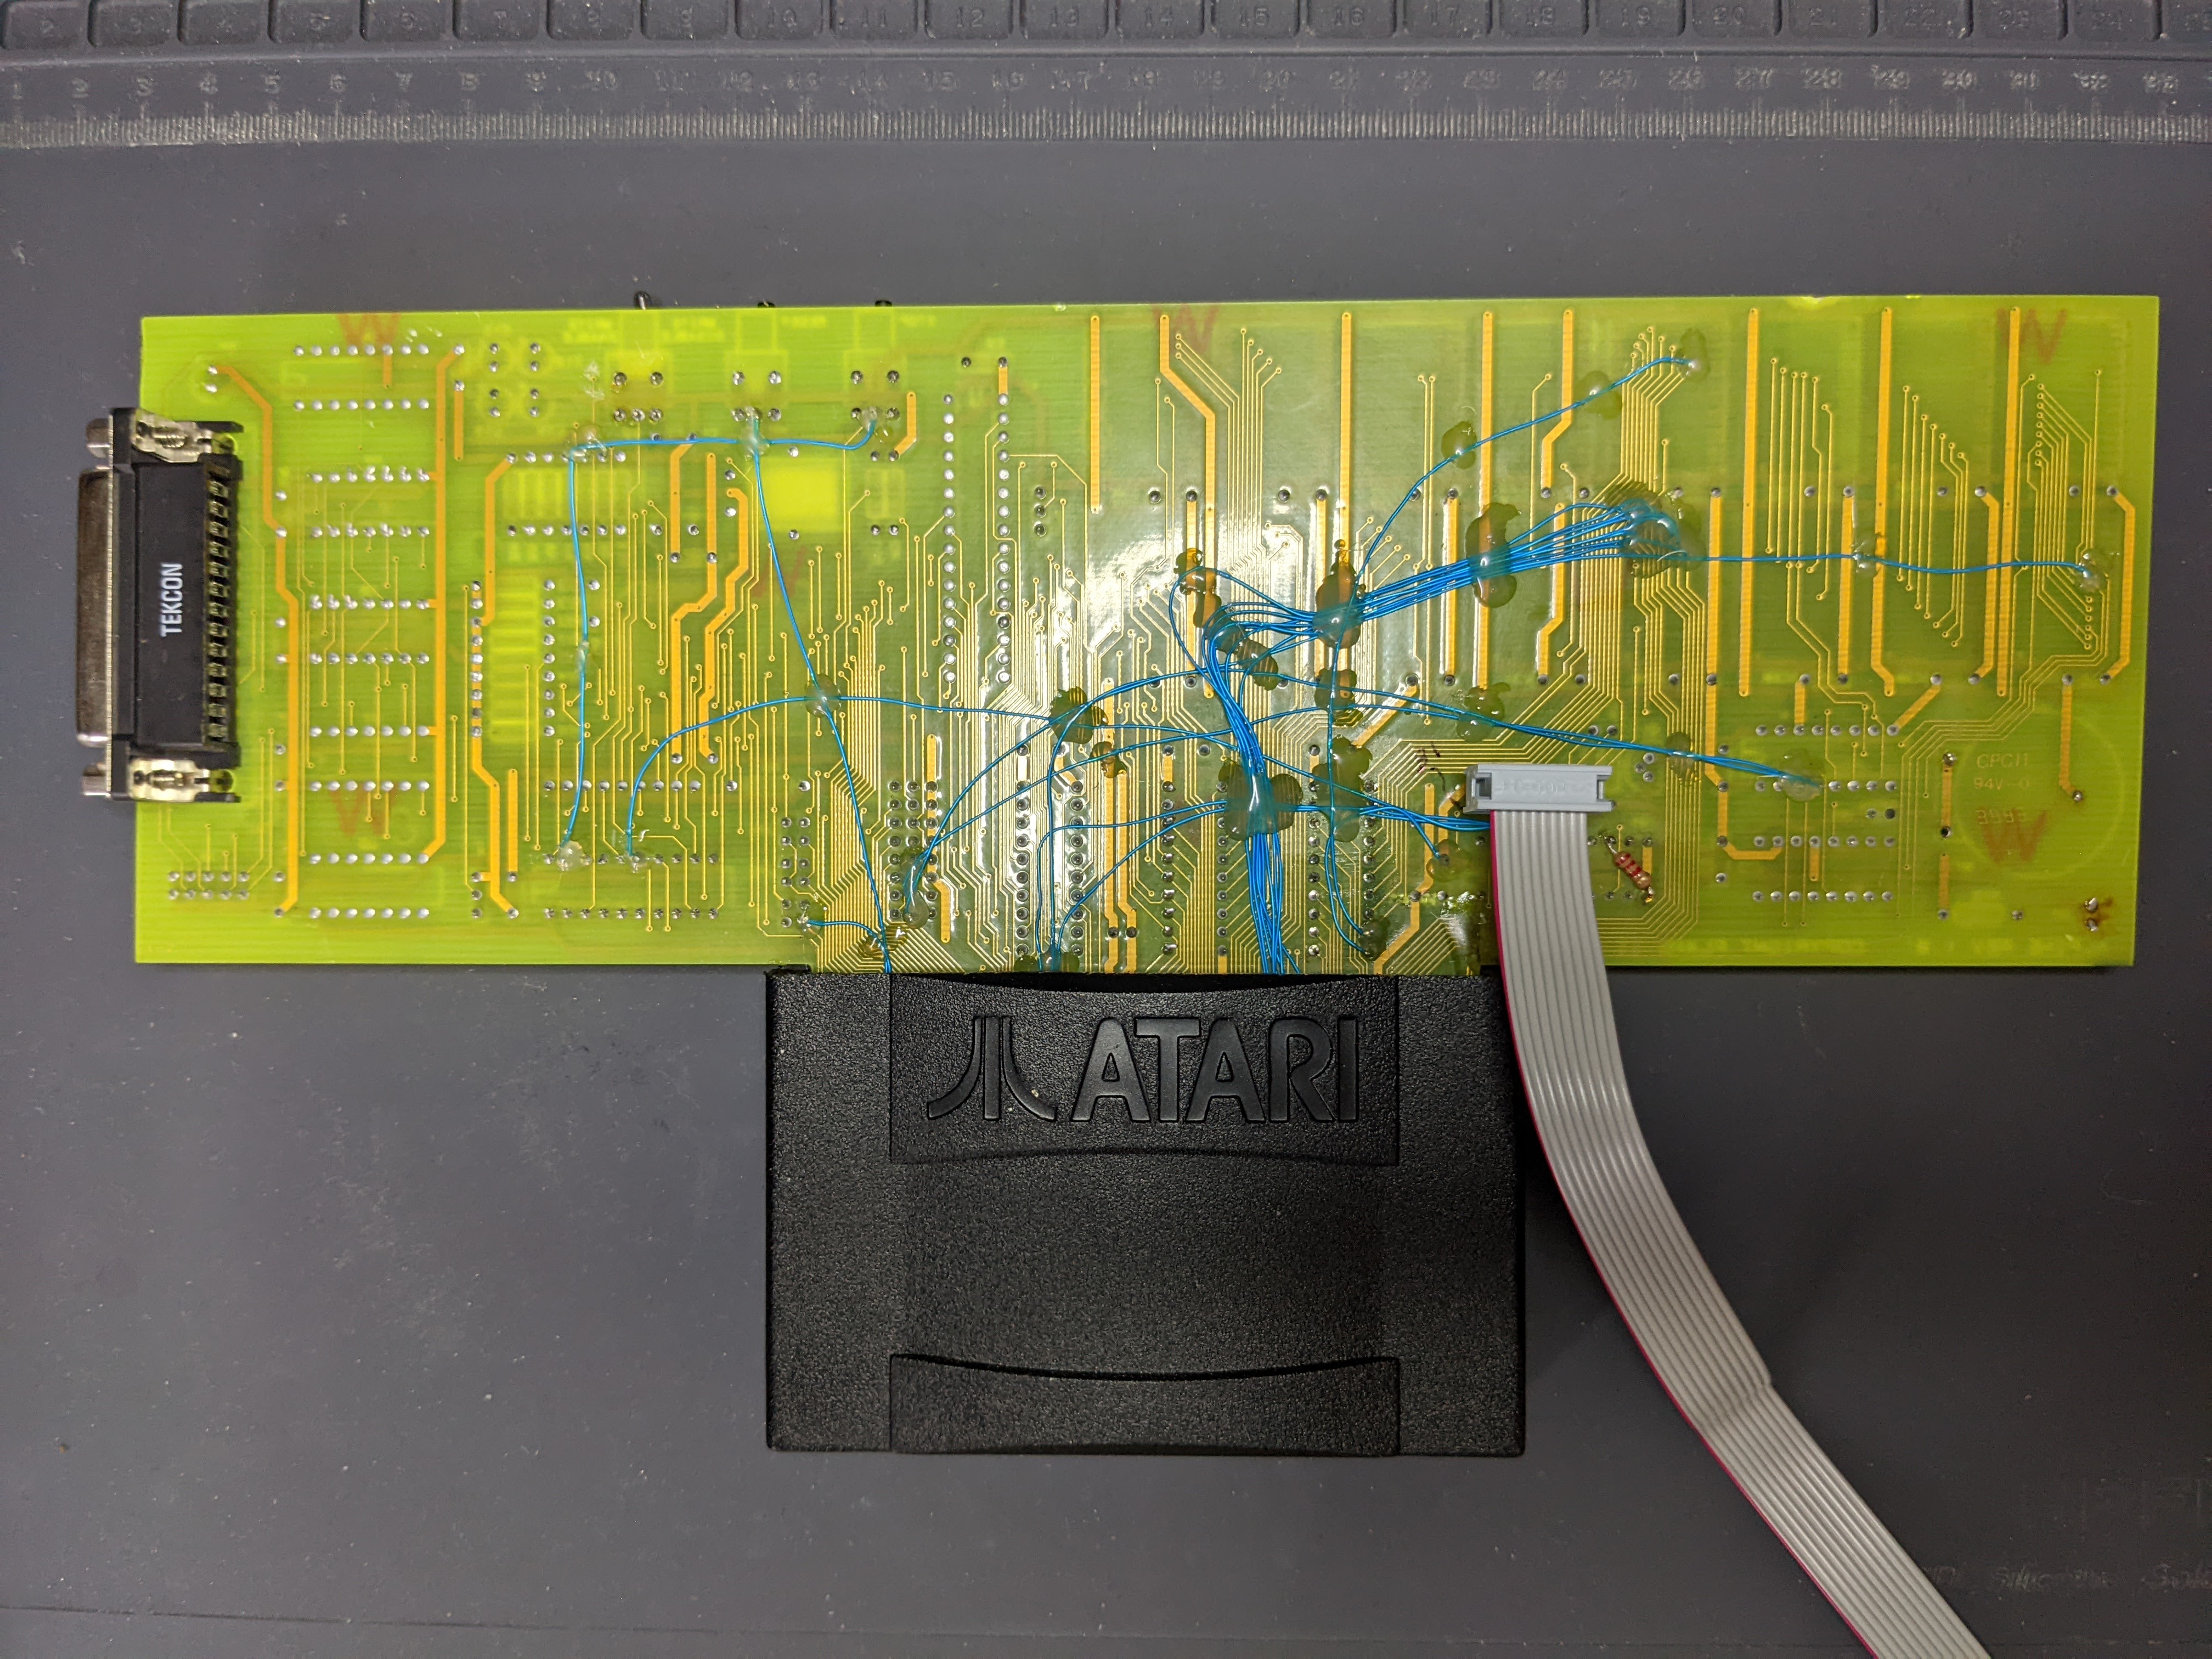
I also needed to wire up a real Stop cable. This is a 10-position/2-row IDC cable. I had to desolder the simple resistor and switch wires I'd been using to experiment with a homebrewed stop button solution and solder on a real 10-pin header on the Jaguar to connect the cable to, and route it out of the Jaguar somehow. As an aesthetic choice, I decided to mount a header on the outside of the Jaguar case to plug an external cable in to rather than run a cable out from inside the Jaguar. That way, when I wasn't using the Alpine board, there wouldn't be an unused ribbon cable dangling off the side or back of my Jaguar, just an empty 10-pin socket. I'm hoping this will also make it easier to splice in an internal stop button later.
Besides the hardware preparations, I also needed to prepare the software on the PC side. The Alpine requires a real bi-directional parallel port, which no reasonably modern computer has. I have one old motherboard with a parallel port that I used when I first got a Jaguar to do BJL uploads, but I don't have room for another computer on my desk (I already have 7 plus a Jaguar and a Rasberry Pi), so that didn't seem like a good option in the long term. The computer I normally use for BJL is actually an old Agilent Infiniium Oscilloscope that is just a Windows XP PC with some special cards and software and fancy buttons on the front. I just use remote desktop to log in to it and run the BJL uploader. However, the Atari debugger software used to communicate with the Alpine board is truely ancient, and only exists in Linux or DOS variants that likely wouldn't run on Windows XP. To use this machine to work with the Alpine board without sacraficing its Oscilloscope and Logic Analyzer functionality, I'd have to set it up to dual-boot DOS or Linux and Windows XP. Fortunatley, at the advice of my neighbor, I'd previusly replaced the tiny ancient IDE disk with a SSD using a rather rare M.2 to PATA adapter card, which besides offering about 4 times the space, significantly sped up the boot process of the scope. This left me plenty of room for another OS. Given the choice of DOS or Linux, I chose Linux obviously, and after a few scares, I had 32-bit Ubuntu 16.04 booting alongside Windows XP. Note it had to be a 32-bit flavor of Ubuntu, as the processor in the oscilloscope, a Pentium III, does not support 64-bit mode. Yes, I have to debug the 64-bit Jaguar on a 32-bit processor, just like its creators did. I chose Ubuntu 16.04 rather than 18.04, the last LTS release to provide a 32-bit installer, in hopes it would support the ancient a.out-format programs from the Atari SDK, but in the end, there was no benefit and 18.04 would have been fine too.
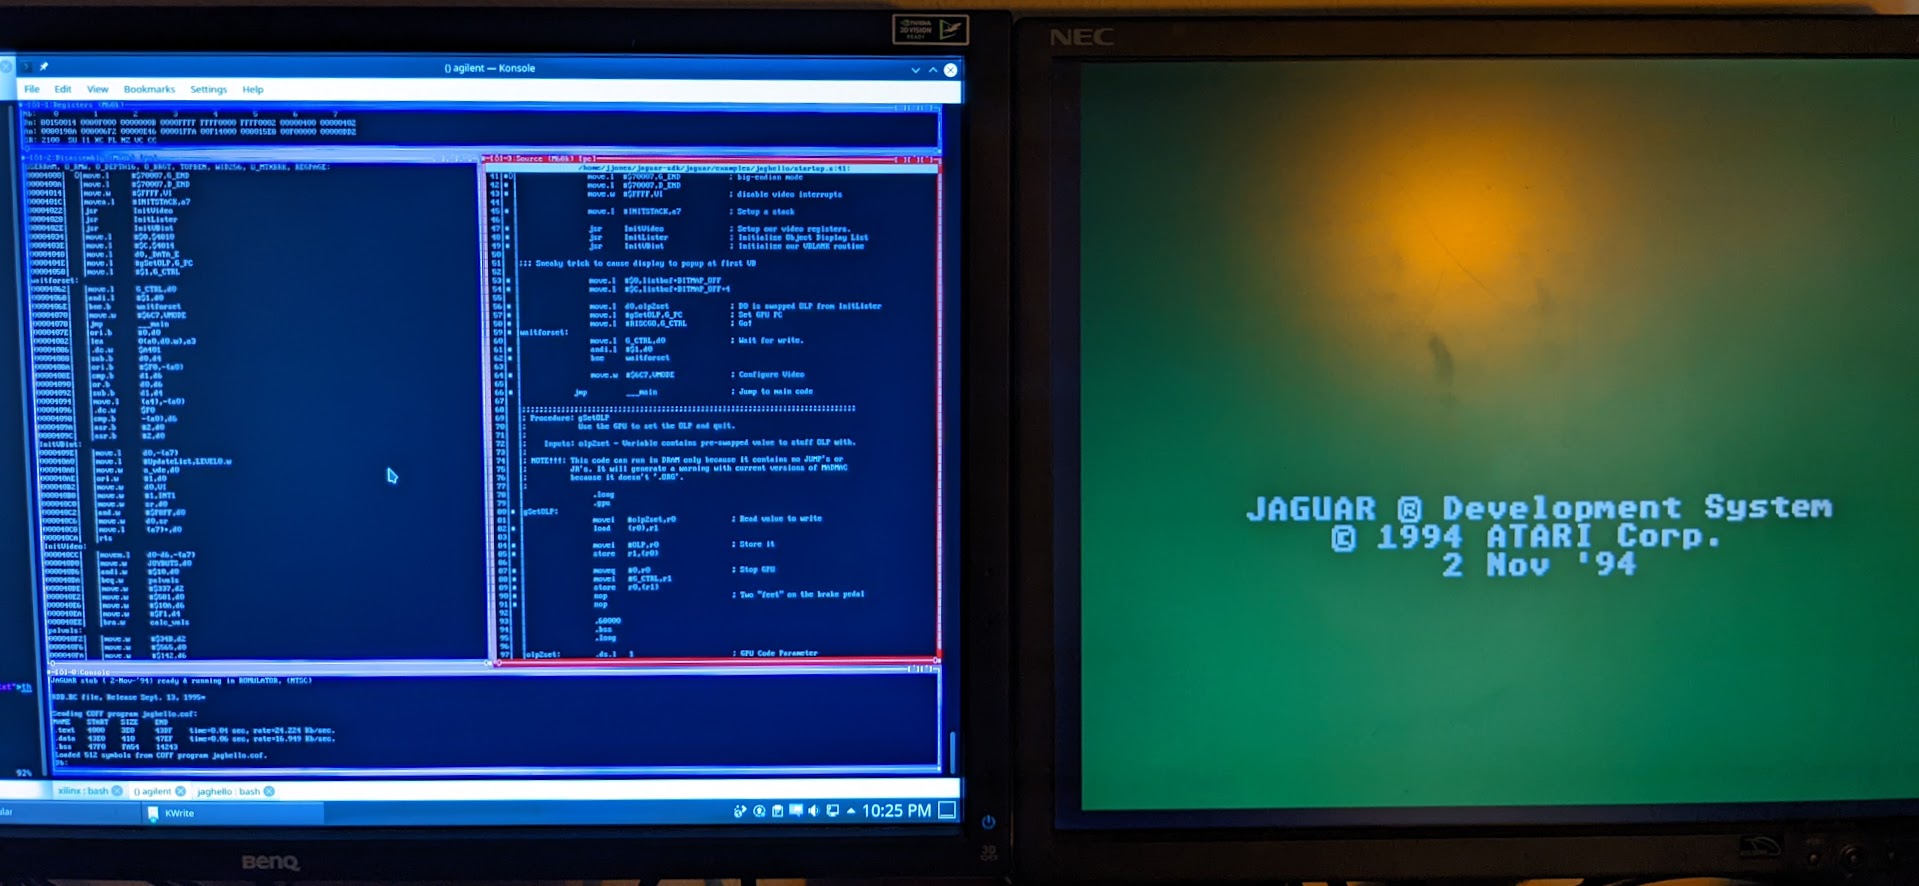
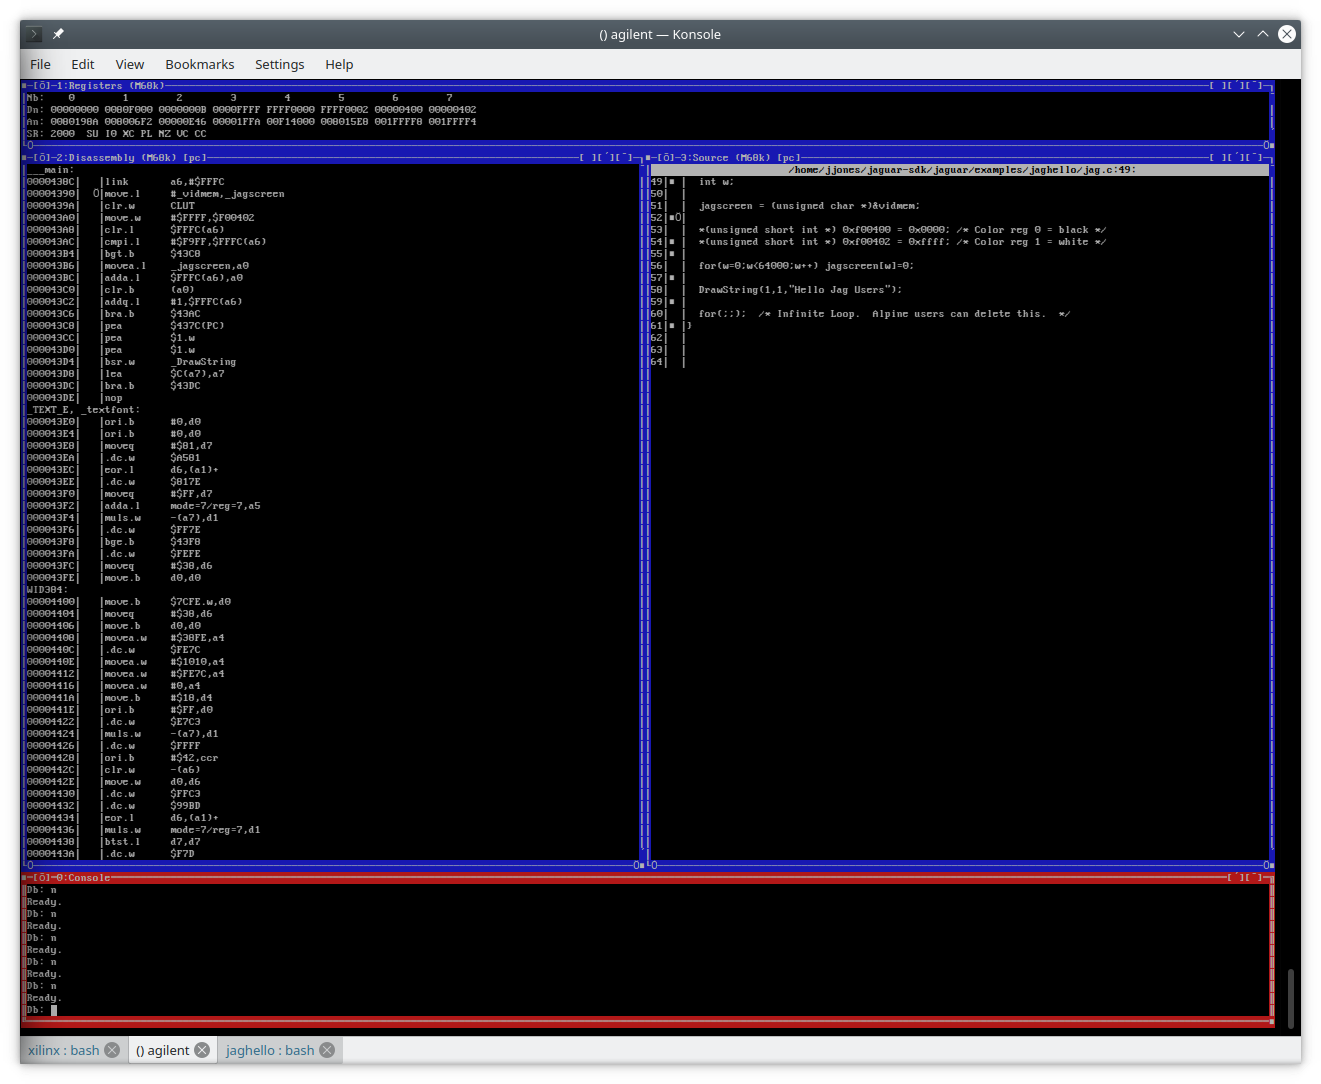
Finally, I had to learn how to actually use the software. You can't actually start rdbjag or wdb, the two incarnations of the Jaguar remote debuggers, without an Alpine attached to the computer, so I wasn't even entirely sure they were going to work, nor how to use them if they did. Fortunately there is actually relatively thorough documentation of their functionality in the Jaguar SDK. rdbjag is just a remote variant of the Atari 68k Debugger, db, tailored to the Jaguar with support for the JRISC processors. A very thorough manual covering the commong db functionality was included in the Jaguar SDK. wdb is essentially an alternate UI for rdbjag that provides a "windowed" interface. Don't get too excited though. We're talking 1990's DOS-style windows here, meaning you get windows drawn with text characters inside a single terminal. Think cgdb, if you're familiar with that program. Still, it does make debugging a lot easier by providing you with always-up-to-date views of things like the register state, source and dissassembly views of the code surrounding the current instruction, and even a decoded view of the Object List in separate boxes on the screen. Basically, most of the features you'd find in a modern graphical debugging tool, but with a retro interface. The additional functionality rdbjag and wdb provide on top of the base db stuff is pretty well documented in this text file in the Jaguar SDK.
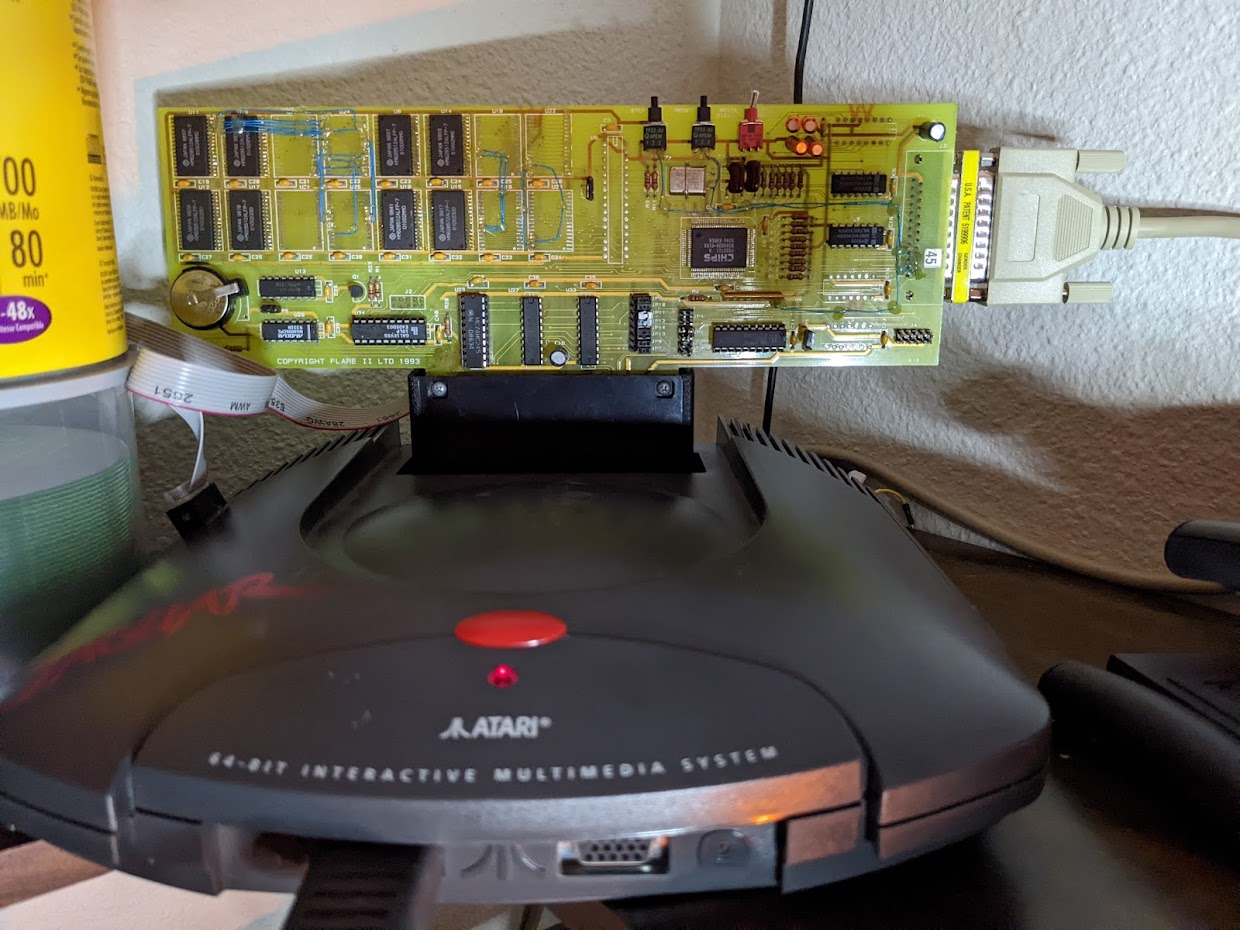
I have a bunch of pictures of the hardware mods in progress as well as fun annecdotes and tips to share on the software set up, but this page is already far too long, so I'll just say that in the end, the entire operation was a success! Here are a few pictures of the end result in action:
 Back To the Alpine Board Saga Index
|
Back To My Jaguar Info & Repair Guides
Back To the Alpine Board Saga Index
|
Back To My Jaguar Info & Repair Guides